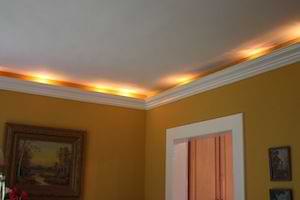
Crown molding can be cut using a couple of different methods, it can be coped on inside corners and mitered on outside corners, or it can be mitered on both corners using either a miter saw or a compound miter saw. Coping (described below) can be difficult and time consuming, but if you're willing to do the extra work, and possibly cutting the same joint more than once if you mess it up, coping will produce a virtually seamless union on inside corners. Coping should only be done when using real wood trim, don't try to cope MDF moldings, the paper edge will not standup to the honing process and gaps will result in the joint. It's better to use miters on inside corners when using MDF for this and other trim installations.
Outside corners will always be joined using a mitered cut, and in the case of crown, a compound mitered cut will be required to make the union. On this page you'll find instructions for cutting and installing standard 52°, crown molding using both mitered and coped joints. Included are the angle setting for a compound miter saw and step-by-step procedure for hanging the molding.
Use a Compound Miter SawTo form the angles required to install crown molding the wood must be cut in two directions at once, first it must be beveled and second it must be mitered. These angles can be cut with a standard miter saw by holding the board at the proper, slanting position against the back of the saw fence, and setting the blade for the necessary angle. This can be a bit tricky to get an accurate cut and dangerous as you have to hold the piece with your hand to prevent any shifting during the cutting process.
A better solution is to use a compound miter saw which makes it possible to cut these complicated angles simply by setting two pre-marked guides on the tool. With this method the crown can be cut while laying flat on the table because the blade tilts to the necessary beveled position instead of having to prop the board up manually.
A typical compound miter saw will have a stop marked on the bevel scale and two marks on the miter scale for setting the proper angles for cutting both, 52°, and 45°, crown molding. The scale on the back sets the blade bevel, and the table pivots left and right to set the miters. The procedure illustrated here shows how to use this saw to cut standard crown with a 52°, angle on the ceiling edge and a 38°, angle on the wall edge like the crown profiles at this link .
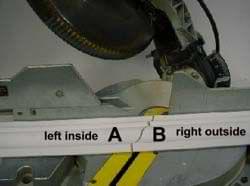
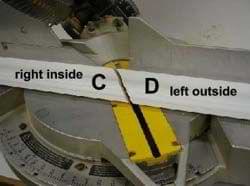
Set the saw by tilting the blade and setting the bevel angle at 33.86°, using the guide on the back. Leave the bevel setting at this position throughout this installation procedure. Some compound saws have a double bevel feature, this makes it possible to tilt the blade left and right, instead of just to one side. If you have a saw like this, use only the left bevel position for the installation procedures on this page.
With the bevel locked in, set the miter angle by moving the saw table left and right of center, the position will alternate depending on which corner piece will be cut. Set the table at 31.62°,-left to cut the pieces that will form the left-inside and right-outside corners, pieces A and B pictured here. Set the wall edge of the crown against the fence to make these cuts.
To set the angle for the matching pieces, shift the table to the right and set it at 31.62°,. With this setting the right-inside and left-outside corners, pieces C and D. can be cut. Place the molding with the ceiling edge against the fence to make these cuts.
Notice that the inside corners, A and C. will always be on the left of the blade and the outside corners, B and D. will always be on the right.
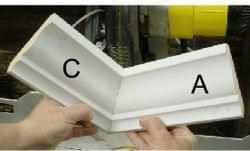
Start at the right corner of one wall with a helper holding one end of a tape ruler, measure to the next corner. Use this length to choose a board to run the full length of the wall. If one is not available, combine 2 shorter pieces using the technique described below.
With the profile facing up and the ceiling edge against the fence, set the guide for a right-inside/left-outside corner and cut the right end of the board to form piece C. Make the cut as close to the square end as possible to avoid waste. Leave the board on the table after making the cut to measure and mark the opposite end to cut corner A .
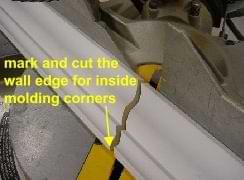
All measuring and marking for inside corners should be done using the wall edge of the molding as the reference. Measure along this edge and mark the other end of the board with a thin pencil line. Set the blade to cut piece A by shifting the table to the left and setting it at 31.62°,. Leave the blade bevel set at 33.86°,. Turn the molding around and place the wall edge against the fence, site along the blade to line it up and cut just outside the pencil mark. Check the fit and adjust if necessary before installing.
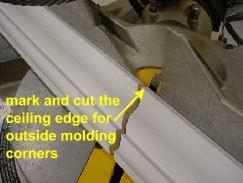

Take a wall measurement and mark the molding on the ceiling edge, always use this edge as the reference point when measuring and cutting outside corners. To cut a left-outside corner, piece D. slide the saw table to the right and set it at 31.62°,, leave the blade bevel set at 33.86°,. Place the ceiling edge of the board against the fence and site along the blade to cut just outside the pencil mark.
To cut a right-outside corner, piece B. slide the saw table to the lefts and set it at 31.62°,. Turn the board around and set the wall edge against the saw fence, line up the blade focusing on the pencil mark on the ceiling edge which will now be closest to you. Make the cut just outside the mark. Check for a good fit and install the piece using the instructions below .
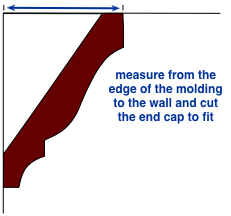
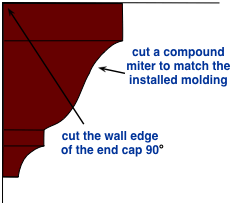
To terminate the molding at the end of a wall, a ",return", can be used for a neat, finished look. A return is a small piece of trim cut with a matching angle and glued into the gap at the end of the run. Start by measuring the wall where you want to terminate the crown and subtracting an eighth inch from this length. Cut the crown with the appropriate outside corner and install it making sure it doesn't extend past the end of the wall.
Measure the distance from the wall to the face of the installed molding and choose a short piece of leftover trim to cut a matching outside corner. Be sure the piece is long enough to cut safely and cut the proper angle on one end. Next, mark the length taken above and cut the other end at 90°, to fit flat against the wall.
Check the fit and then brush the joining edges of both pieces with a thin coat of wood glue. Caulk the ceiling edge of the return piece and press it in place. Wipe off any excess glue or oozing caulk with a clean, damp rag and tape the pieces together with painter's masking tape until the glue dries. Don't try to nail these small pieces in place, the force will invariably shift the cap out of position and wood splits are almost guaranteed.
When working with stain-grade trim. avoid using too much glue or caulk on the edges to prevent oozing. If the bare wood absorbs the water-based glue or caulk it won't absorb enough stain when the time comes, leaving white blotches in the finish.
Installing the MoldingBefore installing the crown, locate and mark wall studs and ceiling joists using a pencil. To find the framing, use a stud finder or tap across the wall with your knuckle while listening for a difference in the sound produced. In general, a hollow sound indicates a space behind the wall and a sharper sound indicates framing. The difference between the sounds will give you a rough idea of the location of a stud or joist. Use a drill and an eighth inch bit to bore in where you expect to find the framing, if the bit passes straight through keep drilling across the wall at one inch intervals until you hit wood. Mark the location of each framing member with a pencil mark that can be seen when the trim is in place.
Just before installing the crown, caulk along the two edges that make contact with the wall and ceiling. This will ensure that the crown stays in place and will also serve to fill gaps in rough or irregular surfaces. Use these tips to smooth out excess caulk that squeezes onto the walls and ceiling before moving on. Don't use caulk on stain-grade trim to avoid contaminating the wood grain.
Install the molding, holding it up and shifting the placement until the edges lay flat against both the wall and the ceiling surfaces. Drive a nail through the thick part of the wood at the top, into the ceiling joist about 2 feet out from each corner. Continue driving nails at each stud and joist to secure the mid section, but leave the ends loose to allow for adjustments when joining the matching corner pieces. Some nails can be driven into the plaster or drywall but these should be kept to a minimum, to ensure the trim stays in place, be sure nails are driven into wood framing at regular intervals across both the wall and the ceiling.
At the corners, brush the mating edges with a thin coat of wood glue and join them, adjusting the two piece together until they form a smooth union that lays flat against the walls and ceiling. Nail both pieces, top and bottom, at the corner and smooth out any glue or caulk that squeezes out onto the trim before it has time to dry.
Nailing crown in place will be much easier with the use of a pneumatic nail gun. These tools will drive and sink the nails, all in one easy motion. A nail gun with a mid-range capacity to fit 1½, to 2½, inch finishing nails, is a good choice for this and most other decorative trim projects. If no nail gun is available, drill pilot holes and drive 2½, inch finishing nails with a hammer and counter sink the heads before filling them with painter's putty to finish.
Combining Two PiecesIf two pieces of trim will be needed to run the full length of a wall, they should be joined with a mitered or scarf joint, rather than a straight, butt joint. A scarf joint will blend the two pieces together so that the union is undetectable and cracks won't form later as the two pieces move independently.
Plan to make the union over a framing member to allow for nailing and choose two pieces of molding that are bit longer than you need to allow for cutting the corners after the scarf joint is made. Set the saw for a right-inside/left-outside corner and place the ceiling edge against the fence, slide the right end of the board under the blade. Make the cut to form piece C. Cut the second piece with the ceiling edge against the fence and slide the left end under the blade to cut piece D. Temporarily join the two pieces on a flat surface to measure and mark the ends to the proper length. Cut the two ends with the appropriate angles and glue the mating edges of the scarf joint just before installing them.
Correcting Cutting MistakesIf the piece you've cut is just a little too long, put it back on the saw and line it up siting down the blade to remove about half the kerf width and try the fit again. You can usually sneak-up on the right length in this way. If the piece is much too long, measure the wall and the piece again to determine where to make a better cut.
If the molding is too short, caulk can sometimes work to fill small gaps, but if there is a large gap in the joint, cut a new piece to correct the error. Salvage any short pieces by joining them with a scarf joint to make longer pieces or use them for short runs like on a dogleg wall or around a window well.
A Word About MeasuringWhen measuring walls at inside corners it can be hard to know exactly what point to use as the reference mark. Most plaster and drywall corners are rounded, not square, making it difficult to get an accurate measurement. To avoid cutting a piece too short, always used the most extreme point as the reference. The piece can always be trimmed slightly if it turns out to be a bit long when installing.
At outside corners the cut on the back of the trim should line up precisely with the wall corner. If you can hold the board up to the wall and draw a line on the back using the corner as a straight edge, that is the most accurate method to get a precise measurement. If you can't do that, use the most extreme point on the wall corner to take your measurement and sneak-up on the length if you have to.
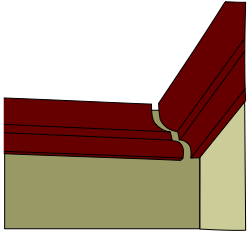
Coping a molding joint requires cutting out along the profile of one of the pieces so it butts against the other piece to form 90°, or any other angle that forms an inside corner. Plan the layout of each piece before beginning the installation. A general rule of thumb is to make the piece most visible from the entry door a solid piece that butts against each wall, if there are two inside corners. Using this approach, the mating pieces on the two adjacent walls would be cut with a coped joint. At their opposite ends those pieces could either be butted or coped depending of the best arrangement. How to decide depends on visibility, if the joint will be very visible because it is viewed straight on, conventional wisdom says to butt the end and cope the mating board because it will be less noticeable than seeing the coped board straight on. Use this method to plan each joint and choose the boards you will use for each run.
Install Piece OneThe first step is easy, just cut and install the first piece so it butts against the corners on both ends, if necessary use two pieces and splice them together with a scarf joint in the middle of the wall. If one of the corners will be an outside angle, then butt the trim at the first wall and cut the other end with it proper angle using the compound miter angles above .
Cut Piece TwoUse a piece of molding several inches longer that the length of the second, adjacent wall. You may need to cut the cope more than once if you mess it up and the longer length will give you enough wood to work with.
Cut the end to mate with the first piece at a miter just as if you were using a compound miter joint to make the corner. Run a pencil lead along the trim profile to highlight the edge to be cut.
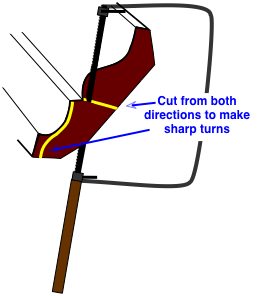
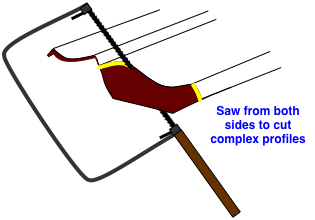
Use a coping saw to cut along the profile and remove the wood from the back. Hold the blade at an angle sufficient to cut the back off the molding face.
Make multiple cuts from all directions to help in cutting as smoothly as possible to avoid damaging the sharp line of the profile. Make as many entry cuts as needed to follow each line of the profile.
When you've cut along the entire profile, turn the molding over and use a sharp drywall knife to shave away the remaining excess wood from the back. Check the piece for a good fit. If it doesn't fit snuggly, keep shaving wood from the back until the two pieces fit together neatly.
If you damage the edge of the profile while honing the fit, creating gaps in the joint, cut the end off again with another miter and start again. Cut just enough off to remove the damage, so if you mess up again you'll have enough trim left to try again if you need to.
When the two pieces mate smoothly, cut the opposite end of the coped piece to suit the opposite wall corner. If the wall is very long and you need to make a coped joint on the opposite end as well, cut it from another piece and joint the two with a scarf joint.
Related Articles on This Site


0 comments:
Post a Comment